Sunday, April 5, 2015

~Beauty Review: Too Faced Chocolate Bar Eyeshadow Palette~


Hello every bunny! Happy Easter weekend! Hope your day is full of pastel loveliness galore!! Today I will be reviewing this Too Faced Chocolate Bar palette that I bought, maybe, three weeks ago or so~ I figured since I've been using it quite frequently I ought to talk about which colors I've been using most often and my overall thoughts about these eyeshadows! Do keep in mind as you read through this review, however, that I'm quite new to makeup and this is my first eyeshadow palette that I've ever used so that will likely be reflected in this review! Hahaha ^.^ So let's get to it then!

***TL;DR at the bottom of this post if you'd like to view the pics and skip on though ;D***

I originally bought this at JcPenney, kind of on a whim because I've been wanting it since I saw the packaging when it first came out however long ago. I mean that's basically what stole my heart in the first place, packaging always gets me! >__< And then I did some research on some other lovely blogs and found out that the palette is chocolate scented!! And then I knew I HAD to get it! So I saved up (aka didn't impulse shop for things like I always do T__T #jobless) and then splurged! I figured since there are lot's of neutral, everyday, basic colors in this palette I could use it on a daily basis and just learn how to use the same colors to go from a casual daytime look to a more formal night look when I need it! And like I mentioned I've never used eyeshadow before, maybe only a bit for homecoming in the past but my makeup wearing through high school was little to none! So I wanted a palette that I believed I could get plenty of "mileage" out of in terms of versatility and quantity. And this one seemed it fit the bill! (And then some with the packaging ;D)

I ended up returning the JcPenney one however and bought it at Macy's instead because they had a deal going on where you could get the Too Faced "Better than Sex" mascara and primer. Little did I know that Ulta had a promotion where you could get the mascara, primer, and eyeliner sample when you buy Too Faced T___T Oh well~ hahaha I'll do a review of the mascara and primer after the eyeshadow!

Upon opening the beautiful eyeshadow you can see the names of each of the eyeshadows on a plastic film type cover that's removable. I only kept it so I could use the names for reference for reviews, it would've been nice if the names were printed under the eyeshadows like I saw on the Semi-Sweet Chocolate palette for those who do a lot of makeup tutorials though!

Here are the colors I frequently use in the palette:


1. Milk Chocolate- I use this color the most! From contouring (which I just learned how to do and can sort of barely do, I think? haha >.<) to my eyelid crease! I haven't really looked up eyeshadow tutorials yet so I just put what I think will look good ^__^ And so far I like the look of this shadow right on my lash line when I don't want to use eyeliner and just mascara!
2. Salted Caramel- another color I use for contouring and a nice color I like to sweep over areas I think are too pale on my face as it adds a nice natural tan-ness~ The foundations I use are pretty light to I use this to liven up my face a bit! 
3. Marzipan-This is my favorite eyeshadow so far as it's a shimmery pinky brown color that is quite subtle and simple! 
4. Semi-Sweet- I use to contour my chin area and also as a lash liner as another eyeliner alternative ^.^ See how versatile this palette is? 
5. Creme Brûlée- This is my second favorite eyelid color ( I like all the shimmery shadows on my lids!) and I use it when I want a fancier look since it has more of a gold tone than Marzipan but it's still quite subtle with a few strokes. 
6. Strawberry Bon Bon- I think this is meant to be a blush! And the name is so adorable <3__<3 I tried it as a blush but I'm already kind of naturally blushy so I use it on my eyelids sometimes when I wear my pink eyeliner! I also like to apply it before the Marzipan sometimes and it seems to make the color pop a bit more~
7. Champagne Truffle- I was told this is a highlighter, also good for contouring! I put a dot of this on the inner corners of my eyes and sometimes even underneath my eyes to create a bright eye effect. 
8. White Chocolate- Last but not least I use this color on top of my concealer around my nose and under my eyes sometimes when the bags are particularly dark and noticeable! It sets my concealer quite nicely I think ^__^ 

I have also tried the top right dark brown color for eyeliner but it's very pigmented and dark so I only use it when I really want to have a nice faux eyeliner look! The purple I haven't experimented with yet, which is surprising considering that's the only color I used every homecoming before when I used my mom's eyeshadow palettes! Hahaha


These are my top four colors I pretty much use every day and the order I put them on today! 1+2+4 contour, 3 eyelids!


When I first got the palette I didn't know it didn't come with brushes so my mom gave me one she wasn't using >__< It does the job, but I don't think it's meant for eyeshadow hahaha oh well! 

And like I mentioned this buy came with samples:


Up top is the Too Faced eyeshadow primer and the renowned mascara! Well I don't know if it's renowned but I heard some people were excited about this mascara. 


They ran out of the actual Too Faced samples so the lady squeezed some in this sample thingy for me ^.^ I was like ok yeah primer, you put it on before the eyeshadow and everything will be dandy! But this primer just has a terrible smell! It's pretty chemically T__T 

Here's what a dab of it looks like on my hand. 


It seems to blend into your skin tone, I don't know if they have lighter or darker versions of this though. The feeling of this primer is also quite oily, I don't know if it's supposed to feel that way as the only primer I have ever used is the sunscreen/primer combo I got from a Meme Box. I don't think I'll continue to use this primer though 3:


As for the mascara, I have a like/dislike relationship with it. It's the only mascara I currently have and when I first tried it I was disappointed. It was super clumpy and the brush is weird. Just look at it! All those bristles! I mean, lots of bristles is probably a good thing but for this particular one it just seems to make the mascara clump! I haven't read any other people's reviews of this product yet though so I don't know if this mascara is actually bad for everyone or if it's my lack of skill and practice in mascara application that made it so bad in the beginning. Now that I've used it three or four times I kind of know the procedure to make the mascara look quite nice. And in the end if you jiggle and flick up smoothly and quickly wipe your finger up your eyelashes when you see clumps, the effects of the mascara are quite pretty and I like the way it makes my eyes look huge!~ But I don't know if any makeup product should require such an odd technique of application so other than using up this sample I have, I don't know if I will actually venture to buy this mascara.

TL;DR: 
~Eyeshadow- 10/10 would recommend for everyday wear, cute packaging, nice smell and quality. But BEWARE! Make sure your have proper eye brushes and things beforehand or plan to buy some with it! All in all, NO RAGRETS! WOULD RE-PURCHASE!

~Primer: 2/10 Smells icky, oily texture, seems to hold my eyeshadow well enough (though it seems to do nothing for the staying power of my eyeliner T__T) 

~Mascara- 7/10 it makes me look like a pretty doll but the effort that one must put to apply it nicely is a bit much for something that should have a relatively easy application. The application process gets a bit messy is all I'm saying, and the results are still a bit clumpy at times. Somewhat on the fence about this one. 

Thanks so much for reading my pretties! I know I mostly posted this just so I could keep up the regular blogging bit I hope you found it useful! Perhaps next time I'll do a post on how I do my everyday makeup? How does that sound? ^__^ 

xoxo Abby~

Sunday, March 29, 2015

~Spring Break Re-Cap! (Long Post)~

 Hello lovely people!~ I think I mentioned this in my previous post but in case you didn't read that one, I'm on spring break! Well...today is the last day of my spring break anyways haha >.< This is just a re-cap so I can try and keep my posts more frequent. I've been trying to come up with a calendar for when I will post things but it's a bit difficult right now since I don't know what my school schedule is like right now.

Anyways, here's pretty much what I did over spring break!


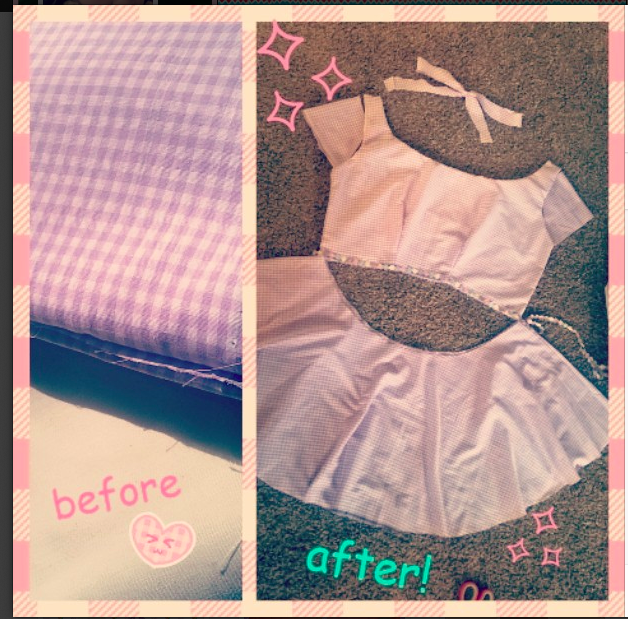
Like I said I wanted to do in the last post, I wanted to try and make myself a full dress with this lilac gingham fabric I got at the fabric store! And this is how it turned out! Well, this is a picture of what it looked halfway through the process hahaha. I was still getting back into the groove of things so I didn't document the process of making this dress. But now that I know what to do I'll be sure to have a tutorial on how to make your own dress in the future!

I was going for just a regular sleeveless dress with a circle skirt at first (circle skirts are the easiest and cutest in my opinion!) and the first thing I started with was the circle skirt on the Wednesday night of my last day of winter quarter. And that's the first thing that went wrong...I did my waist measurement wrong and made a too big circle skirt T___T In most cases when sewing, too big is better than too small, but making a circle skirt waist too big also results in a shorter skirt, and the only nice way I can think of to lengthen a skirt is adding something to the bottom! Sooo I was like, hmm well I like those ruffly hemmed dresses! Let's try ruffles! Lemme tell ya, making ruffles is a labor of love. It takes so much effort to make the ruffles nice and even. And there's a TON of hemming to be done if you have a fabric that frays so keep that in mind with ruffles too!


In the end this is what my dress ended up looking like! I'm holding in the back in the second picture though because that when before I got a zipper and attached it to the back. I plan on wearing this for easter (because, ya know, pastels!) so I can take better pictures of the dress then ^__^ It ended up being a semi-off-the-shoulder type dress as well because I also mis-measured my shoulder to shoulder width T__T I guess I'm terrible at measurements!! 

On Saturday I went to one of my bestest (if you're reading this, hi Kar!! ^__^) friend's 19th birthday par-tay at her house. CAH, Dominos, Cinderella live action and real good company ^.^ 


Moving on, one of the other things I did was go to school! Wait...what?! On spring break?! Yep! I picked up my textbooks and then browsed the cherry blossoms blooming in the quad with my mum~ This picture was actually before they were really bloomy when we went but I got this one off my Instagram since it had a nice picture of Mt. Rainier too~ Actually, most of the pictures in this post are from my Insta haha.


I took a video of the day when my mom and I actually went to see the blossoms. Look how fluffy the trees are!


The next day I went BACK to Seattle, this time with the home gals! (I'm tentative about positing pictures of them, dunno if they wanna be on my blog! I'll ask soon though!~) Did some Lush shopping, cupcake eating, Pike browsing, all in some typical WA weather of course ^.^


Thursday was spent with the GNOSPG group once again, this time Piroshky and Crepes and Starbucks mwahahha~


Friday morning I was with my mom at the mall doing some spring shopping and found some awesome things! Pixapet at UO, Little Twin Stars bag at H&M, pastel pink jellies at F21 along with some colorful tights, and some face stuff at UO as well! I also managed to find a nice pink eyeliner which I'll be trying out and (perhaps) reviewing on here soon!


Hahaha oh conformity. (Yes I got Starbucks twice in one week) But It was worth it!! CAKE!! I wasn't disappointed when I tried the limited edition birthday cake flavor at Starbucks, but I think I'll just stick to my usual double chocolately chip or something. Or just eat one of their overpriced cake pops >___< hahaha.


On the same day of the Starbucks adventure, my uncle and aunt took my sister and my cousin to get some yummy tofu! This is Soon tofu from BCD Tofu House yummy <3 When I got home at around 1:40 am full of tofu and bubble tea (and half a grande cake frapp!) I was about to throw up @__@ But somehow I still had room for a red velvet cupcake?! Cheat week~ ahahha And I got to see one of my bests again after so long! (hi Christina!) We had no time or patience for selfies on our sucky phones but I can't wait til' we get to hang out again in the summer or something!

And here we are today on Sunday! Me just relaxing and blogging about the whole experience ^__^ I think this was my most productive SB yet because I did something pretty much everyday besides watching Youtube and staying indoors doing nothing. Both of which are totally fine things to do (especially for introverts like myself! I love breaks!) But it's fun being busy too, even though it's super exhausting phew! Alright spring quarter, I guess I'm ready for you! Let's finish freshman year of Uni off strong!

XOXO Abby !~

P.S. Sorry for such a long post! <3

Wednesday, March 18, 2015

~What's to Come! (DIY's!)~

Hello all! Sorry for the brief blog hiatus. I guess a few weeks isn't such a long time, and no one has probably noticed since this blog is fairly new haha. Anyhow, due to finals I had to focus less on my blog these last few weeks. Today was my last day of finals (an interesting story I'm sorry I don't want to go into haha) and so I decided some sort of post was due! I have a few DIY's lined up for spring break which should curb the blues that always come with the end of a quarter. Uni is tiring you guys, lemme tell ya. It's worth it, but it can just be so...Well, let's just say when in doubt make sure you're on time to things. Just anywhere in life in general, but ESPECIALLY on finals week. Get where I'm going with this? Yes? OK GOOD! I'll rant about this on my private tumblr later hahaha. OK! So just to document some of the DIY's I'm interested in possibly doing this week (partly so I remember which DIY's I have materials for and partly because posting which DIYs I'm going to do will motivate me to actually do them!) here they are in no particular order:

**fair warning: a lot of these DIY's are going to be purse DIY's but they're AWESOME novelty bags so if you're into that kinda thing, stay tuned!!**

Also, it's very likely that I won't do all of these projects but if you have a preference for one that you'd like to see, let me know and I'll definitely try it out for you guys! :D

1.) I saw this amazing tutorial by hellosharla on Youtube of how to make this milk purse that I've been dying over since Olympia Le Tan released it whenever they did. All you need for this one is some cord, thick stock paper or the equivalent, felt, and glue (hot glue/fabric glue preferably). Soooo easy and cute!
Olympia Le Tan Milk Purse *swoon*
hellosharla DIY milk purse!! Just as adorable!
2.) Hohoho I warned you these would be a lot of purse tutorials! Next up is this SUPER cute egg purse that I spotted on this website. I found out about inu-inu through instagram as I was browsing through some posts and I was like "This website looks like it sells amazing clothes I could never afford" hahaha. Also, I'm not 100% sure but some of their stuff doesn't look original? Like the two piece egg set looks like the one by famous Japanese plus size brand Punyus and there's no credit for it? Hmmm...

This bag could either end up really good or really bad since it's one of those pretty simple and straightforward kinda ideas. I mean take two white pieces, cut them into egg shape, stick yellow thing in middle and add handle. How hard could that be? hahaha we shall see...

There's also this one from the site as well, which I might attempt to make if this first egg purse goes well and I have some materials left over. 

I have to live up to the name of my blog right? GIMME ALLL DEM EGGS MWAHAHAHA~

3.) I have definitely been wanting to make a roll cake slice bag even before I saw someone who makes and sells them online, but seeing them like this just wants me to make one even more!


These beauties are by Lucky Ladybird Crafts and she has a website here if you want to skip the making process and support her lovely bags! I wish I could just buy one but I want to take a crack at making one myself! Hahaha~

I also kind of wanted to make a purse in a triangle cake slice shape like this one here that I'm using as inspiration from sheylara blog! Which is an AWESOME blog I highly recommend if you like cute slice of life blogs~


This awesome cake purse was also an inspiration I saw on Pinterest <3

4.) *whispers* ok last purse I swear! This one looks like the most difficult one because I'm bad at circles but I loveee pancakes (What's with me and food novelty purses?! They're just so cute!! AHH!)


Honestly this one is more of a stretch and I don't think I'll attempt to make this one this spring break, maybe summer break if the other bags end up nice. But to really make this one look good will just take more effort that I guaranteed will not give this spring break...

~Pardon my continuous bitter bad mood, post finals behavior for the time being please. Just bear with me for a bit, ok? haha sorry <3~

I don't know, I guess it's just the idea of purses being so easy to make that makes me want to make all these purses. But I know the process will actually be much more difficult than it seems hahaha!

OK LET'S MOVE ON FROM PURSES NOW OK ABBY?! OK.

5.) I went to the fabric store a week ago and this pretty purple gingham fabric has just been sitting pretty in the bag just waiting to be styled into any one of these gorgeous spring styles I've been pinning since winter <3

If you saw last (last last?) week's Wednesday wish list post you know how I feel about pastel gingham and gingham in general <3 This DIY has been stalled for TOO LONG I SAY! TOO LONG! xD


 These are the two styles I was going for. Originally I just wanted to go a bit simpler with the circle skirt and top with (maybe) some sort of collar like the dress on the left. But then I saw the cut of the dress on the right and now I'm TORN (cue Natalie Imbruglia song!)


This one is quite a bit more ambitious but if I'm feeling up to it, mayyyybe I'll attempt it? It's really only the neck and collar area I'm concerned about ^__^. If you have an idea on which one I should make (left? right? bottom? part of left? part of right? etc.) Let me know in the comments please!

Welp, that's pretty much all I have in store for spring break right now! Hopefully doing all these DIY's and doing some spring cleaning will get me out of this pitiful rut I've gotten myself into haha.

xoxox Abby

P.S. If you're interested in more potential DIY ideas I may attempt in the future I have a Pinterest board specifically for possible future projects! So interestingly named "Making" (my way downtown walking fast faces pass and I'm homebound) haha. Have a looksie and a hope you have a better day than I'm having *stomps away lovingly*

Wednesday, March 4, 2015

~Wednesday Wish List~


Wow 2 posts in 1 day?! Did I just do that?! Yeah I did!! Let's be honest I crush on a bunch of things all at once all the time. This list is merely a fraction of the things I am currently obsessed with...today...or maybe even just during this one hour right now. Hahaha~ As you can see most of these things are dresses <3 One thing to note about me is that I'm anti-pants. More specifically anti-jeans. I dunno, there's just something so comfortable and free that I feel in a dress than in a pair of jeans. Just letting you know, I'm pretty sure most of these items are unfindable at the moment, but don't let that stop you from finding similar ones! I actually just grabbed most of these things from my Pinterest and some from my Polyvore haha. Check them out if you have the time!~

So without further ado, this Wednesday's Wish list:
1.) I'm soooo in LOVE with gingham at the moment! Gingham skirts, gingham dresses, gingham shoes~ UGH and don't get me started on pastel gingham <3 Just too dreamy!! In case you are wondering just what gingham is, it's a type of lovely checker/plaid print many people refer to as a sort of picnic table print fabric! As seen in this first dress on my wish list (which is actually from this website, but is unfortunately sold out 3:)

2.) This next dress is also sold out but I believe also comes in a two-piece set (crop top+skirt) combo (also quite irresistible <3) and is actually a fairly new item on Hello Holiday as far as I know. It's called the Dinomyte Dress and is pretty much the absolute most perfect dress I've ever seen *swoon* I mean, DINOSAUR PRINT IN MULTI COLORS?! Yessss pleaaaase!

3.) I ALMOST got the limited edition Syrup Etude Ballet Bag at Kinokuniya last week but I bought the My Melody tote instead because it was just too darn cute! But I'm a bit more fond of the tote in this lavender color--the lim. ed. bag had red slippers with a kitty inside!!--because you know me and pastels ;D  I have no idea how to order on these Japanese websites so if anyone knows the website for this bag is here and please tell me how I can order these! It comes in light pink, blue, red, and black as well~

4.) If you're like me and you are obsessed with collecting stickers AND you love cats AND you love kitschy little websites then you'll love Pygmy Hippo like I do! They have so much more than stickers there but one of the things I'm currently crushing on is this packet of Cute Kitty Sticker Flakes! It comes with an assortment of 70 stickers in 10 different designs :D There is a fancy animal version too! I need them both oh my gosh. There are tons of other things they have in stock right now that I'm swooning over so check em' out!

5.) This Organza Embroidered Polka Dot Smock Dress in pink is such a dream dress! I have a black and sheer polka dot dress that's sleeveless with sheer panels and this pink one from The White Pepper would be a perfect spring or summer version! I've always been in favor of smock type dresses as I like the way they fit and feel on me and The White Pepper has a TON of these types of dresses~ This is just one of my ultimate favorites of theirs at the moment haha.

6.) Ok, so I've been crushing on this Fuuvi Biscuit Camera forever since I bought their white chocolate digital camera a couple years ago. This sweet little camera would be a perfect addition to my novelty cam collection <3 I found one that's available on ebay right now but I never use ebay so I'm not sure how that will work out haha. I hope I can find one on a camera website or Amazon @_@

7.) These shoes are just the best thing I've ever seen <3__<3 sparkly, rainbow-y, pink, little beads in the tongue, organza/tulle lacey shoelaces, they're just too perfect! If only I knew how to purchase them on Swankiss. Or I could just go to Japan and buy them in person O_O wouldn't that be a dream come true! :D

8.) I've liked off-the-shoulder dresses since I've been seeing them in these pretty spring pastel colors. This one on my list is from yet another website which I can't understand. But I'm sure I'll be able to recreate this somehow with dresses and some fabric? Hopefully? Maybe? Spring break hopes <3

9.) And last but not least these sassy rad headbands again from Hello Holiday that I have been obsessing over these past few weeks since I found their website. Their pieces are just so quirky and fun!! And either of these beauties would be a perfect addition to any outfit~

There ya have it! This Wednesday's Wish list is complete! If you want to see some similar things I like scroll up to where I linked my Pinterest, there are a bunch of goodies there~

Thank you so much for reading lovelies!! Even though my posting faltered a bit here in the beginning of March, I do think this whole blog thing might work out for me? Yes? Ok! Yes!!

XOXO
~Abby

~Mini Post: Irregular Blogging and a Mini Semi-failure of a DIY- Acrylic Tie-Dye Dress~

March 1st, 2nd, and 3rd outfits so far! Channeling bears, crop tops, and spring pastels <3 I cannot WAIT for summer to come even with this nice spring weather though~
 Hello all!~ Sorry I haven't really been posting lately. I've been a bit busy these last few days with midterms (EVERY FRIDAY without fail, by the way) and schoolwork in general so that took up quite a bit of my time. What I guess I'm trying to say is that I really want to keep up with this blog without messing up my everyday schedule. Soooo I thought a mini post would suffice for now. Don't worry though! I have a few DIYs lined up for this weekend (hopefully!) if I can meet my weekly homework goals hahaha ^__^ 

Front of dress: patchy in places, the colors looked super cool when I first unfolded it and then got lighter as I rinsed it out.

I actually DIY-ed tie-dyed a dress with acrylic paints but I was so caught up in making it that I forgot to take pictures of the process! Ooops haha~ I basically just squirted a bunch of acrylics fresh out of the bottle onto a 92% cotton cream colored dress, spread the colors with a paintbrush, poured warm water over the dress, flipped it over and repeated (except water), let sit for a few hours, rinsed, and got a shoddy pastel-esque dress.

OF COURSE the back of the dress is ten times better/more vibrant than the front side T__T 
Tips when using the acrylic paint tie-dye technique:
~ find a good, legitimate tutorial with pictures of the process and results and actually follow those directions or else yours will turn out like mine....
~ ^^ this means water down your acrylics with water in squeeze bottles before applying to your garment. Since I applied mine directly some areas got color and other areas are just large dingy slightly purple grey patches.
~Try to find a 100% cotton dress, it will make your like over 9000x easier and you will have less anxiety about those pretty colors (and all your hard work) flowing down the drain
~I cut the bottom half from the top half of my dress and tie-dyed them separately because I thought it would help with distribution of colors and it would look color. The way you want your pattern to look is your choice of course ^_^
~ leave the paint in until the garment is dry for the most part. It doesn't have to be completely dry, the longer you leave the colors in the more vibrant they will be!

I was actually kind of going for a pastel color for my dress, but after seeing some of the colors come out nice and bright I ended up liking that look better. I might go over some of the "balder" areas on the dress again like the left and right side of the skirt part on the back and front. I guess if I really wanted to I could wear the dress backwards? Hahaha, no one would be the wiser ^__^

That's it for this post! I reallllyyy wanted to do a Wednesday Wishlist post so if I get my work done in a timely matter I'll work on that next!

T.T.F.N! <3
~Abby

Sunday, February 22, 2015

~DIY: Mission Turn EVERYTHING Into a Brooch/Pin~


I have THE easiest ever DIY for you guys today: PINS!! Yup! Super easy right? Just trying to get back on track with crafting after weeks and weeks of midterms EVERY FRIDAY. It's great to be able to finally have a weekend where my homework load isn't too too heavy and I can sneak in a bit of leisure time. Today my sister and I watched The Incredibles for the first time in 2015 :D That made me super happy, I can't wait for the long awaited Incredibles 2!! Coming out next or next next year I believe? Anyways, on to the DIY!

Supplies:
~Some little odds and ends you want to become a brooch/pin! For this tutorial I used these super kawaii earphone reels I've been seeing at Daiso for forever! Little things like these make great brooches!
~Superglue or hot glue
~Brooch/pin backs- available at most craft supplies stores like Hobby Lobby, Michaels, Joanns etc. But I got mine from Daiso as well <3 (Oh how I love Daiso)
~A knife or sharp object for "scoring" the back of the object for your brooch (optional but recommended, see tutorial down below for why!) Sandpaper could also be used if you have some on hand!

***WARNING!***
Sharp object and hot glue are dangerous! Make sure to always use these tools properly and as instructed! Even super glue can get messy and annoying (I accidentally got some on my fingers and now they feel all weird O__o) so be careful!! <3


Those brownish lines you can see at the back of my earphone reels are called "scores" or scratches I made at the back of my object to make the glue adhere better! This helps if the back of your object is rather smooth, roughing the back up a bit allows the glue to get into the grooves and really allow the brooch base to stick on. If your object is already quite textured on the back you can skip this step! And remember to be super careful when scoring! I chipped a nail while simply trying to open the darn pocket knife I used for the tutorial haha.


The last step is the easiest! Using the glue of your choice (although I don't recommend Elmer's school glue for paper or glue sticks because they may not be sturdy enough, unless your object is made of paper? Oooo that would be cool, like an origami brooch! Still, super glue or hot glue is the best) place a dab on the area you just scored and stick your brooch back on! Do remember to put your brooch back on the proper way. I've bought button from places that had the pin on going backwards, just make sure the opening of the brooch is the way you are comfortable with pinning things on. For example I prefer that the opening of the pin is on the left and the pin itself is on the right. Kind of weird to explain, just look at the back of some of your favorite buttons/pins and see how the backs of those open and close, then make sure yours are going the same way! Ok? OK!


Then ya just have to let these babies dry and you're all set! I made the mistake of rushing and trying to put on the yellow one ( I thought it would be dry since it was one of the first ones I did, nope.) aaannd the glue wasn't dry yet T__T Hence the weird gluey fingers haha. Don't do that guys, you might accidentally glue your brooch onto whatever you try to put it on right away so just let it dry! LET IT DRYYYY LET IT DRYYY! Oh you're tired of Frozen references? Oops, my bad! Haha~

Thanks for reading as always beauties!!

XOXO
Abby

P.s. Yay for being somewhat consistent with posts at least once a week! Erm, I think I've been consistent...hahaha!

Friday, February 13, 2015

~Long Awaited Bonne Chance Collections Review~

Too kawaii to resist~

Soooo adorable <3

I called this post my "long awaited" Bonne Chance Collections review, not because you guys have been anticipating this moment or anything. I mean, it would be pretty weird if you were anticipating it since I"m new to this whole blogging thing and haven't mentioned anything about these dresses until now haha. Anyways, LOOK AT THESE SUPER CUTE DRESSES I GOT...summer of last year? Yep, it's been almost a year since I've had these dresses and I haven't been able to wear either of them 3: Pure sadness I know, such a shame. Why haven't I worn these marvelous babies yet you might ask? That's what this review is for! So before I get to the dresses that I have, let me tell you about this wonderful shop called Bonne Chance Collections~


Best part? FREE SHIPPING WORLDWIDE AHHHH~


So I found out about this website whilst scrolling through Polyvore. Often I like to click the links to some of the coolest things I find through there, just to see if  I have any sort of chance of getting my hands on them! And these dresses came up on this website and immediately I was like "WOAH" and all my dreams came true. The price seemed a bit much at first, but when I saw that they always have 25-30% off sales I was like "ohhhkaayyy maybe I'll just buy one" (when secretly I wanted them all, no really check them out they're too beautiful ugh <3) So I saved up my birthday money and planned on buying one to wear to my 18th birthday par-tay. Then I learned that my mom actually got me a couple dresses and gave them to me on my actual birthday ~<3 Such a lucky kitten am I. 


The packages come in this adorable wrapping paper, it's like getting a gift in the mail every time you order! (I'll post a picture of it when I find it, of course I kept it! ;D) The ladies who run Bonne Chance are THE SWEETEST. They write a personalized letter on the cutest cards in their own handwriting and everything. Customer service and satisfaction at it's finest ^__^ If you can bear tearing into the cute wrapping (I couldn't tear it, it took me a solid five minutes of swooning and carefully unwrapping the package to not muck it up) and finally get to the cute dresses, you will not be disappointed. 

Pardon the awful camera quality~

The material of the dresses is quite comfortable. I believe the material of the dresses I got are some sort of cotton blend since the fabric themselves are lightweight, somewhat thin, and not very stretchy. They wrinkle up a bit easily too, but nothing a quick iron before wearing can't fix! Both the dresses I have also have collars, but note how they are only half collars and don't go all the way around the neck of the dress. This makes for a bit of weird adjusting when it comes to wearing it with cardigans and you probably won't be able to get the collar up over a pullover unless it's a v-neck or something. The dresses I got were both also lined so you don't need to worry about wearing an extra slip underneath or anything.

Woah short hair all of a sudden? Nope! It's just an illusion~


Now we're to the part where I have to talk about why it took me so long to do a review. I have a short stature and a wide everything else >__<. And throughout the years you might say that I've come to a kind of understanding with my body I guess. I'm still not completely comfortable with it all of the time, but I do try and just accept it when I must. 

Awkward bathroom selfies 4dayz

My mom ordered me the biggest size their range goes up to: L. On the website it says the waist (the part of clothing I'm ALWAYS concerned about) is between 30-33 inches for pretty much all of their large sized dresses. When I tried on the dresses the first time I got them, the Strawberry Sundae dress was super uncomfortable. I thought I was a 33-ish inch waist back then but I guess not hahaha. Since the Ships Ahoy had an elasticized waist I had an easier time with that one. But it was still rather uncomfortable at first. And I don't think my bust is all that large but it was quite fitted in that region as well.

Busty girls be wary T___T

For instance, I plan on sewing the button down closure on the sailor dress because one of the buttons juts out and creates an opening at the front of the dress! I didn't think my bust was big enough to ever make any buttons pop but there ya go! 


 In this picture you can kinda see the lining of the dress on the inside and how it's tight on my bust area. And this is a picture now! Imagine how ill-fitting  it looked then!

I will take better pictures of these dresses someday~


Since I got these dresses I have lost a bit of weight (not nearly close to my goal but I have the whole year, right? haha) Just enough to be able to a bit more comfortably wear these dresses for the review. These were also taken in the afternoon after eating dinner hahaha. 


I definitely recommend sizing up for busty girls and knowing all your measurements if you aren't typically a size S/M or lower. These dresses can be quite short so the length is nice for short girls, some of my taller friends have said that these are a tad to short to wear without leggings or bloomers underneath without risking "exposure" hahaha. And the measurements on their website are accurate as far as I'm concerned. I re-measured myself before taking these pictures and my waist is give or take 33 inches...in the morning...before I've eaten...haha.

I MUCH prefer how these dresses look with cardigans on me. But it covers up so much of the cute dress 3:


I reaaallyy wish they offered plus sizes and longer lengths to support a broader range of buyers! Let's rally together and plead for them to make more sizes! Hahaha~ I suppose if I can't fit into these dresses without having to lose a ton of lbs (which I should probably be doing anyways for my personal health reasons heh) I'll just have to go ahead and make some of these dresses myself! *hmph* Expect some cute dress tutorials in the future ;D

For now I'll just dream about having these pretty pieces in my size <3

Rocking horses?! Are you kidding me?! *dies* that's...that's just too amazing.

I guess I'm really into off the shoulder right now. Or maybe it's these amazing prints! Seriously though where can I get fabric like this?!

Actual pic from Gal-entines day of my coord~


As always, thanks for reading lovelies! And happy GAL-entines day ;D <3

XOXO Abby