OK OK I know it's not back to school yet but I just wanted to share this tutorial with you because it's super easy and super useful! I LOVE LOVE LOVE pencil pouches, it's a terrible obsession. The other day I was browsing around Kinokuniya Bookstore in Uwajimaya in the International District (Seattle) and I saw these super cute minimalist pencil pouches that had doodles of writing and drawing paraphernalia on it~ I was smitten until I snuck a peek at the price --> $15! No wayyyy I was going to pay that much for such a small pouch.
--> Sidenote: Does anyone else get that little nagging feeling of "oh you can make that! Don't buy it!" whenever you go shopping? It's kind of annoying and frustrating at times because I end up telling myself that I can make something but I don't end up making it T__T Hahaha~
Anyways, I remembered I had some leftover fabric from the overalls I made that would be perfect for simple little pencil pouches! There are tons of cool tutorials out there that teach you how to sew/no sew a pencil pouch. But I just used a quick and easy method that creates a nice clean pencil pouch. Specifically, this is a tutorial for a pencil pouch that has a lining and zipper closure ^__^
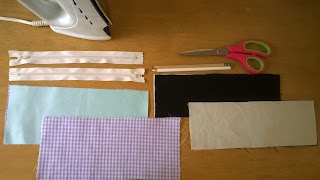
Things you'll need:
-outside fabric of your choice: I recommend something a bit thicker and not a flimsy cotton fabric for the outside of your pouch. It just makes it last longer and hold up nicer! I used bull denim for the black one and some sort of upholstery fabric for the mint one.
-inside fabric of your choice: this one can be any type of nice/cheap flimsy fabric just to line the inside of the pouch (if you'd like, I highly recommend it though!).
-sewing machine <-- with a zipper foot! and thread in matching or contrasting color to your pouch
-pins
-zipper
-iron: highly recommended if your fabric is a bit wrinkly
-ruler and a pencil
-paints, embroidery thread and needle, buttons, cute things to decorate your pouch with if you'd like :D
Difficulty: Beginner! This is a great tutorial for practicing sewing nice straight lines and is especially good to practice for putting zippers in and using a zipper foot! You can practice making tons of pouches and give them to your friends as back to school gifts in the fall or something? Hahaha~
You want to start by cutting out some rectangles, four to be exact: two pieces of your outside fabric and two of your inside fabric, all in identical measurements. Your rectangles should be longer than the longest item you might put in your pouch. This could be your longest make-up brush if you're making a make-up pouch, your longest paintbrush, pencil/pen etc. Ideally you want the fabric to accommodate your zipper as well. My pouch ended up being about 23cm by 12cm with about 2cm extra both lengthwise and width wise for seam allowance :3
If your fabric is a bit wrinkly, now is the time to break out the iron! Woo hoo!
Next you're gonna make a zipper and fabric sandwich! Lay one piece of your lining fabric "right side up" meaning, the "front" of the fabric with the pattern (if you have one) should be facing up. Next lay one edge of the zipper on the edge of the lining fabric facing up as well. Then take your outside pouch fabric and lay it face down (right side down), on top of the zipper. All the edges need to match up and it should look like this:
 |
| White fabric is facing right side up, then zipper, then outside fabric (black) facing down. |
Pin that sandwich together
and straight stitch all the way down!
Try to sew as close to the zipper as you can! Whether you're practicing hand sewing or machine sewing this is a great practice for that ^__^ Then just repeat that same sandwich on the other side of the zipper with the two other pieces of fabric and you should have something that looks like this!
Now lay it out flat with outside fabric and lining together like so
 |
| How it should look from the bottom (will be inside of your pouch) |
To help everything stay in place it's nice to do a top stitch along the zipper like this:
 |
| This is what the outside of your pouch should look like at this point. |
Again make sure to sew close to the zipper, and be careful to keep your outside and inside fabric straight as you stitch or you might ind up with bunchy fabric near the zipper, which might cause it to stick later! So make sure you pull the lining fabric as you sew. :3
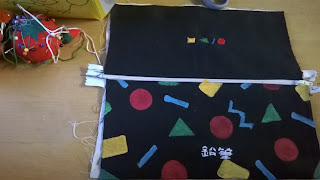
If you want to embroider something onto your pouch I suggest you do that now before sewing it up to prevent having to embroider through both the inner and outer layers of fabric! I painted and embroidered mine before moving to the next step but you can move on if you want to paint afterwards or leave it plain ^__^
Now we are getting to the actual pouch-y part of the tutorial! Start by unzipping your zipper about halfway Take your outside fabric, right sides facing together and sew it shut. Before sewing you could pin all the edges together, which helps keep the sides of your pouch straight. Then do the same with the inside lining (right sides facing together) BUT!!! Leave hole in the bottom big enough to turn the pouch inside out!!! If you forget this step you'll have to cut a hole in your nicely sewn pouch to get it turned right sides out! So don't forget to leave a hole in the lining! You can cut any excess fabric so your pouch isn't too bulky in the end and you can have clean edges and corners ^___^
 |
| On the bottom of the outer fabric side you can see the inside of my embroidery ^.^ |
Yay! Almost done! Just pull the pouch through the hole you (hopefully) left in the lining and through the zipper. Unzip the whole pouch and then poke poke poke the edges and corners of the pouch and you should have this nice rectangular shape :D The last thing you have to do is sew up the hole in the lining, just tuck the edges in and straight stitch ^.^
 |
| First pull through the hole in the lining, then go through the hole you left in the zipper! |
BAM! You've got your very own pouch! Sorry if the tutorial was a bit confusing. If you need help use this and this link for reference :3
I thought about trying to recreate the pencil and pens I saw on the pencil pouches at Kinokuniya, but I decided this pouch would look cute with a little Moomin on it xD So I asked my sister to sketch Moomin for me in pencil and I just filled it in with paint and drew on the details and flowers and such :3 But you can do whatever you wish to do with your cool new pouch!
Happy sewing everyone!c: And sorry for the inconsistent posting again! Summer has been busy and I'm LOVING it <3
xoxo Abby


No comments:
Post a Comment